

Tesla Audio Upgrade Guide: EQ, Speakers, Woofers, and Amplifiers
- Larry Hope

- Jun 11
- 5 min read
Updated: 6 days ago

Most Tesla audio questions start in the wrong place.
Someone buys the car, lives with it for a few weeks, then starts moving the EQ sliders around like a safecracker. A little more bass. A little less midrange. Treble up, then down, then up again. The whole thing becomes a small private weather system.
I get it. The cabin is quiet. That is the gift and the curse. A quiet Tesla lets you hear more music, but it also lets you hear the weak spots in the system. Loose bass does not have anywhere to hide. A thin vocal sits there in the windshield, looking at you.
Quick answer: start with EQ and fitment checks. Move to factory-location speaker upgrades when vocals, mid-bass, or detail are the problem. Use woofer or subwoofer paths when bass shape is missing. Treat TAS amplifier work as signal-chain control, and only take it on if the installation level makes sense.
Start with the thing that costs nothing
EQ is free. It is also honest, in the way a mirror is honest. It will show you whether the sound just needs a small tonal correction, or whether the hardware is already at the edge of what it can do.
If a mild EQ change fixes the problem, stop there. No one gives you a trophy for replacing parts you did not need. Start with the Tesla EQ settings guide, then listen for a few days with music you actually know.
Not demo tracks. Not the audiophile song everyone pretends to enjoy. Use the music that lives in your head. The old song you know from a bad hotel speaker, from a friend's car, from some night you remember for no useful reason.
Name the problem before buying parts
A Tesla audio upgrade is not one product. It is a set of small decisions. The wrong order wastes money. The right order feels almost boring.
If vocals feel far away: look at the midrange and front-stage speaker path.
If bass is big but soft: look at woofer or subwoofer control before adding more EQ.
If cymbals and strings feel closed in: the tweeter position and material may matter more than volume.
If everything sounds louder but not clearer: the bottleneck may be the driver, not the setting.
If the system loses control when music gets dense: amplifier headroom and signal-chain control may belong in the plan.
This is the part people skip. They want the answer first. I understand the impulse. But car audio is still a system. Source, EQ, amplifier, wiring, drivers, cabin, ears. Every step changes the signal a little. Some steps help. Some steps just add noise.
What a speaker upgrade should change
A good speaker upgrade should not sound like someone simply pushed the loudness button. That gets old fast. It is like turning up the lights in a room without cleaning the windows.
The useful change is more specific. Tighter mid-bass. Clearer vocals. More open detail from the tweeter positions. You should be able to follow a bass line without it swelling into the door panel. You should hear the singer's mouth move closer to the center, not just become brighter.
Light Harmonic has focused on Tesla-specific audio upgrades since 2014. A lot of our work is not glamorous. Brackets. Connectors. Factory locations. Small Tesla revisions. The kind of details nobody talks about until one small plastic part refuses to line up.
Where applicable, the goal is factory-location installation and a path that can be understood before the trim comes off. Many Gen 3 speaker designs use neodymium magnets and carbon-fiber materials because weight, control, and stiffness matter in a car door. Not as slogans. As physical facts.
Bass is not just bass
Bass is where many upgrades go wrong. People ask for more. Usually they mean better. Those are different words.
More bass is easy. Better bass has edges. It starts, stops, and leaves space for the rest of the music. In a Tesla cabin, bad bass can feel impressive for ten minutes and tiring after twenty. Like a guest who talks too loudly at dinner.
Woofers and subwoofers are about shape and control. If the low end feels slow, loose, or missing in the lower octave, EQ is not going to invent a better driver. It can only ask the existing one to work harder.
The amplifier is a different conversation
An amplifier upgrade is not a bigger speaker. It sits earlier in the chain. That means it can give the system more control, but it also asks more from the installer.
The TAS amplifier path is intermediate or advanced work. Read that sentence slowly. It is not a legal decoration. If you are not comfortable with trim access, connector orientation, wiring, and electronics handling, read the TAS installation manuals before you buy anything.
For some owners, speakers first is the right move. For others, a complete speaker plus amplifier path makes sense. The right answer depends on the car, the factory audio package, the sound problem, and the person doing the work.
A practical Tesla audio upgrade path
Reset the EQ and make small changes first.
Confirm the exact model, year, trim, and factory audio package.
Decide whether the problem is vocal clarity, bass shape, high-frequency detail, or system control.
Choose a factory-location speaker path when the driver is the bottleneck.
Add woofer, tweeter, or subwoofer coverage when the missing part is clear.
Consider TAS amplifier work only when installation skill and system goals line up.
Model paths worth knowing
Model Y and Juniper
Model Y is no longer one simple target. Pre-Juniper and Juniper vehicles need different fitment thinking. Start with the Model Y and Juniper audio upgrade guide if that is your car.
Model 3 and Highland
For Model 3 Highland, do not assume older Model 3 parts tell the whole story. Compare Highland Zenith 7 and Highland RWD Premium 9 based on your factory system.
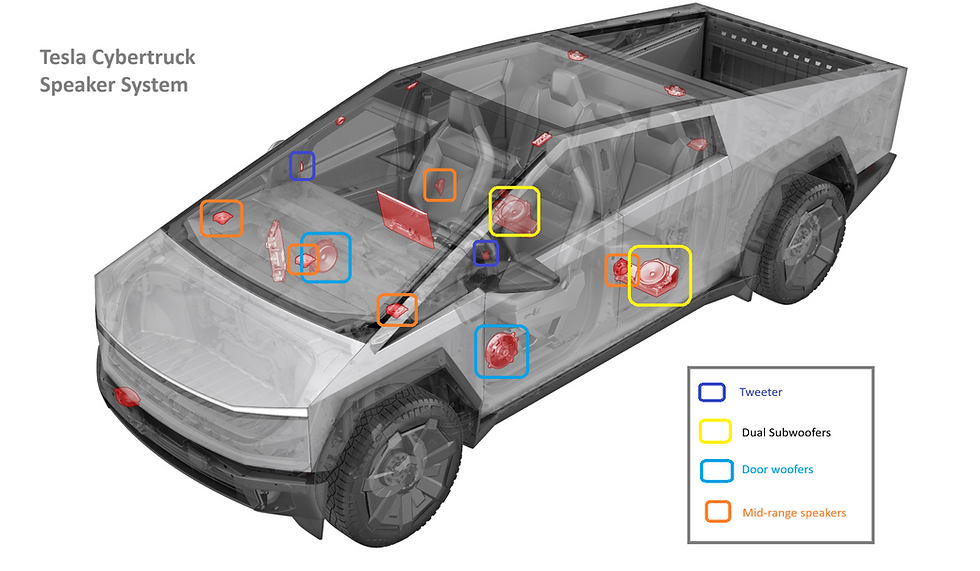
Cybertruck
Cybertruck is new enough that guessing is a bad habit. Start with the Cybertruck audio upgrade guide, then match the exact Long Range, AWD, or Cyberbeast path.
Amplifier paths
For TAS amplifier work, compare Model 3 TAS, Model Y TAS, and Model S/X TAS. Read the manual before treating it like a weekend speaker swap.
What to send before asking fitment questions
Good support starts with good information. Bad information turns into long email threads, and long email threads are where time goes to smoke cigarettes behind the building.
Vehicle model, year, trim, and factory audio package.
Photos of the factory speaker or amplifier connector.
The product name or SKU you are considering.
A short note describing what you are trying to fix.
A photo before forcing any part that does not line up.
Use support if the fitment path is unclear. Use installation videos if you want to see the work first.
Common questions
Should I upgrade EQ, speakers, or amplifier first?
Start with EQ because it costs nothing. Move to speakers when the factory drivers are the bottleneck. Consider amplifier work only when you want more system control and the installation scope is realistic.
Will a speaker upgrade make the system louder?
Sometimes. But loudness is not the point. The better reason is cleaner detail, tighter mid-bass, and a front stage that feels less trapped inside the dashboard.
Do I need professional installation?
Most speaker paths are DIY-friendly for the listed vehicle when the fitment matches. TAS amplifier work is different. Treat it as intermediate or advanced.
Good audio is not one big move. It is a few honest moves in the right order.

Comments